
The Beauty & Function of the Natural Curves of the Spine
Last month at The Pilates Collective, our theme was the spine—but really, this is our theme every month. Since much of Pilates is based on taking care of that lovely column of bones that keeps us upright, we want to make sure you know how great a gift the spine is and how to keep it healthy.
Your spine consists of 33 small bones stacked on top of one another and linked by the spinal cord. These bones, called vertebrae, are categorized into five areas: the cervical, thoracic, lumbar, sacral, and coccyx. Although the spine keeps us standing straight, the structure is anything but. There are actually three natural curves of the spine (four if you count the tailbone).
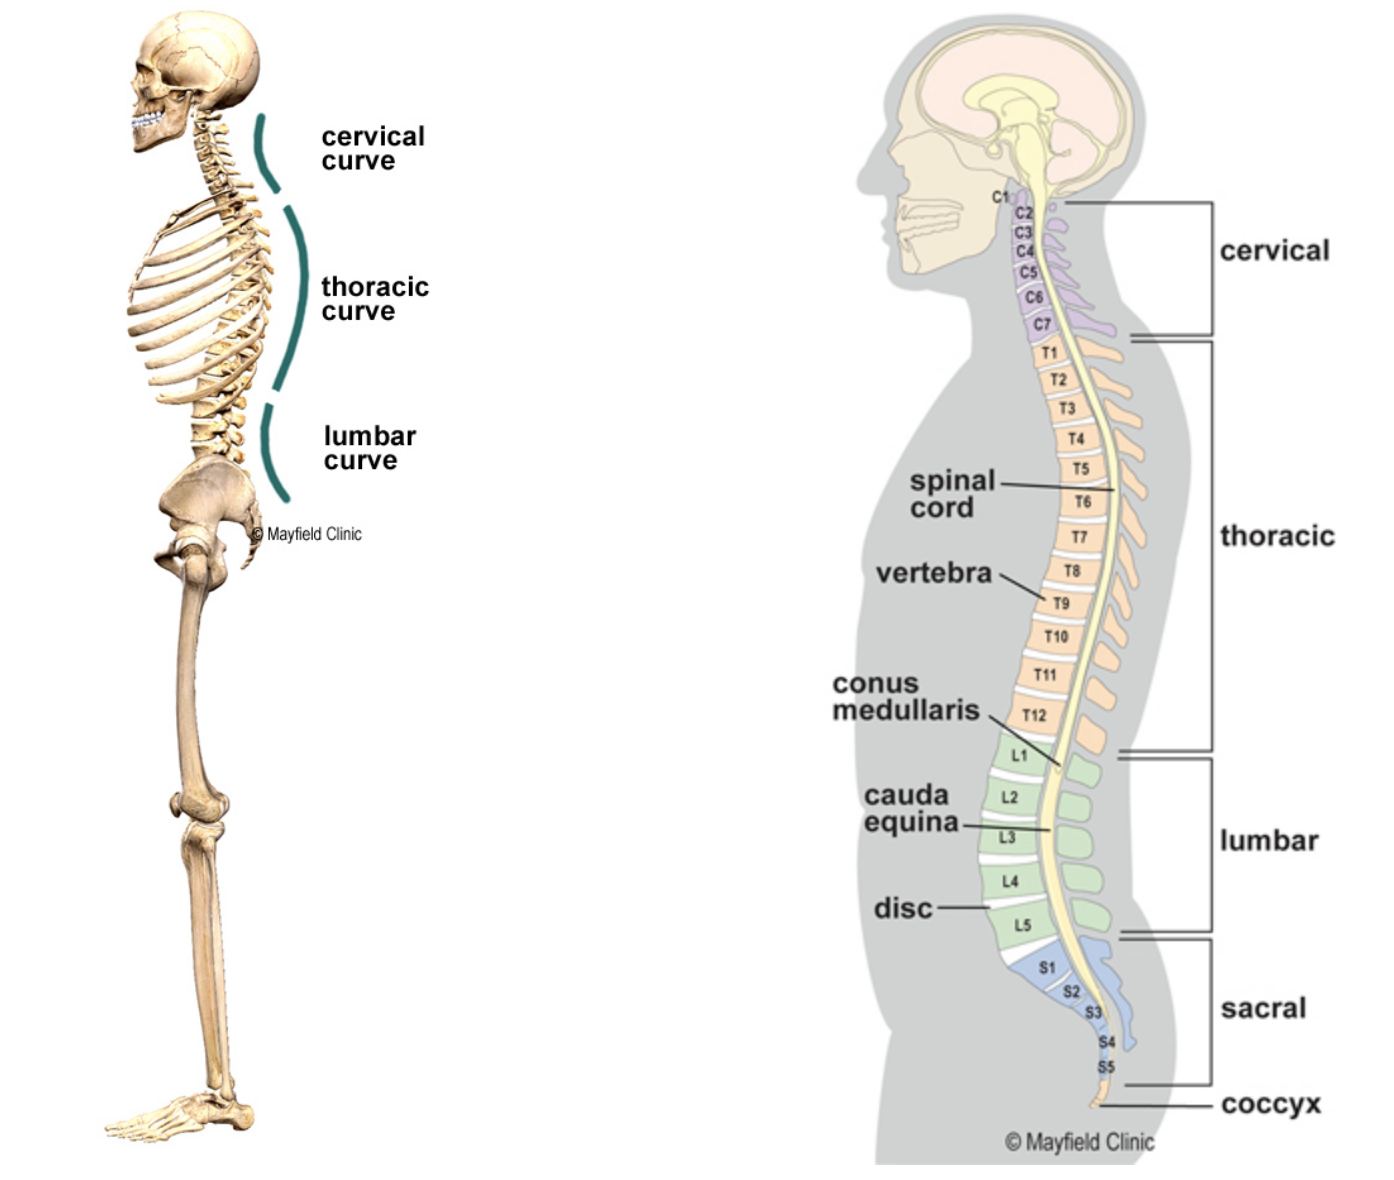
The spine starts at the base of the skull with 7 cervical vertebrae, typically the smallest of all 33 in your body (which is ironic considering they support the most important organ in your body: your brain). These small but mighty bones form the cervical curve of the spine, allowing your head to align so your ears are at the top of your plumb line. If you nod forward and reach your hand to where your neck meets your back, you’ll likely feel one bone sticking out. This is C7, which stands for the 7th cervical vertebrae.
Below C7 are the 12 vertebrae that form the thoracic curve. The thoracic vertebrae connect to the ribs and curve in the opposite direction of the cervical spine, allowing the heaviest part of your torso (the part containing your internal organs) to stay balanced over your center of gravity. Next is the lumbar curve of the spine, consisting of 5 vertebrae and connecting to the pelvis. The lumbar vertebrae reverses the curve of your spine again, curving the same direction as the cervical spine. This brings your pelvis underneath you so you’re not walking around with your booty sticking out. Below the lumbar are 5 sacral vertebrae and 4 coccyx bones. Once we reach adulthood, the sacral vertebrae fuse to form the sacrum (the broad bone in your lower back just opposite your hip bones), and the 4 vertebrae below fuse to form the coccyx, or tailbone.
A healthy spine maintains all of these curves. Try this quick test to check in with the natural curves of your spine. Note that this is an exercise for awareness, not to diagnose an abnormal curve of the spine.
Lie on your back on a relatively hard surface (not something soft such as a bed). Bend your knees and put your feet flat on the ground. Close your eyes and do a quick scan of your body, noticing the areas where you feel your weight sinking into the floor. In a healthy spine, you should feel the back of your skull pressing into the floor, then a space between the back of your neck and the floor. You’ll feel your spine curve towards the floor again, pressing your shoulder blades and the middle of your back against it. The lumbar curve of your spine will lift your lower back away from the floor slightly. This may create a small space or you may feel that your low back is not pressed into the floor as heavily as other areas. Then you’ll feel your sacrum rest on the floor.
These curves of the spine act as shock absorbers and help align the rest of the body for optimal movement. Unfortunately, due to lifestyle and genetics, our spines don’t always maintain their natural integrity.
Abnormalities In Curvature Of The Spine
There are a few scenarios leading to an abnormal curve of the spine, the most well-known being scoliosis. You might remember your doctor as a child asking you to bend forward and reach for your toes. That wasn’t a test for flexibility, it was an examination for scoliosis.
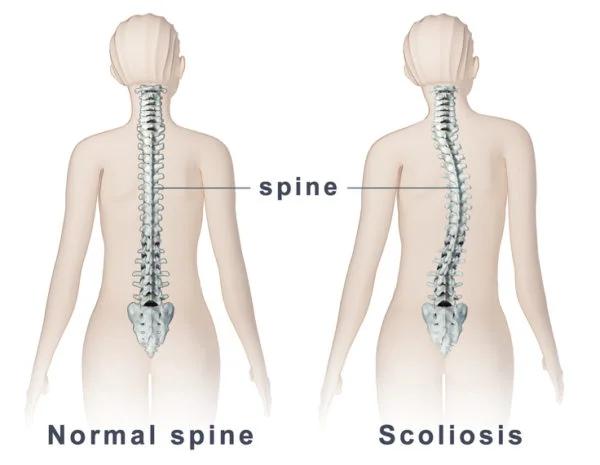
If you were looking at a normal spine from the back, it would look relatively straight: the cervical vertebrae would be above the thoracic, which would be above the lumbar and so on. In a spine with scoliosis, the spine would be visibly curved, bulging either to the right or left to mirror the lateral curve of the spine.
Scoliosis typically reveals itself in late childhood, which is why your doctor kept an eye out for it. We aren’t sure exactly what causes this condition, but the effects of scoliosis can include other asymmetries in the body, irregular muscular development, and in extreme cases, pain. Especially in mild to moderate cases, Pilates is a great form of scoliosis correction.
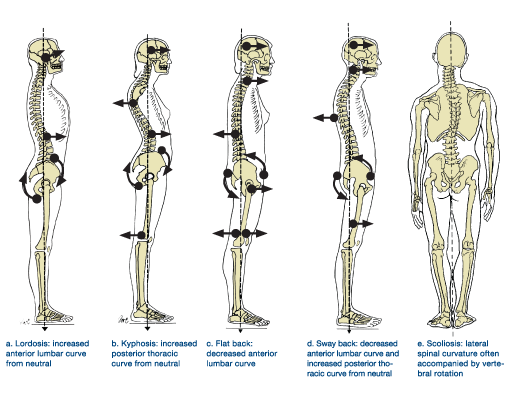
Aside from scoliosis, there are many common cases in which the primary curves of the spine are distorted in some way. A lordotic curve of the spine refers to an exaggerated lumbar curve, causing the back to arch and the tailbone lift. Think cow pose in cat-cow, or the cue of showing off your tail feathers. Kyphosis describes an exaggerated thoracic curve. This may be accompanied by a forward head, which creates a caving of the chest and a hunched back. Kyphotic and lordotic curves of the spine often go hand in hand. In a flat back, the spine has a flattened lumbar curve and possibly a flat thoracic curve as well.
Many of us may not have abnormalities severe enough to require a diagnosis, but we may suffer from a loss of mobility in areas of our spine. A loss of thoracic spine mobility, for example, is very common.
No matter how mild or severe the issue, it’s possible to take strides towards keeping the spine in proper alignment with specific lifestyle changes.
Do an audit of your posture over the course of a few days. Notice your alignment as you work, drive, walk, sit at the table, stand with a friend at a party. In particular, notice how you position yourself when on your computer or phone. For most of us, we tend to jut our head forward and the rest of our posture deteriorates from there. We round in the upper back, tuck our tailbone underneath us, and slump down, putting pressure on the lumbar spine and sacrum. If we sit like this for extended periods of time day after day, we’re in for trouble.
To prevent the forward head and the domino effect down the spine, make some adjustments to how you use technology. The jutting forward of the head is typically a result of trying to see the screen better. When in this situation, we’re typically so focused on what we’re doing that we fail to notice our posture.
The easiest way to get around this is to improve settings on your devices so you don’t have to pitch yourself forward to see. Make sure your screen is bright enough. If necessary, magnify it so that you can see when in proper alignment. Friends might make fun of you for having your screen zoomed into 200% in your 20’s, but who will be laughing when you’re 80 and standing tall while others are hunched forward?!
Here are a few other adjustments you can make to maintain a healthy spine:
If you sit for long periods of time at work, optimize your work station and for ergonomics. Typically this means raising the level of your monitor to eye height when sitting up tall, using an external keyboard and/or mouse so your hands stay even with your elbows, and using a chair that encourages good alignment. Bonus points for desks that allow you to alternate between sitting and standing!
Take breaks when sitting for long periods of time by moving, stretching, and walking throughout the day.
Incorporate physical activity into your routine at least 3 times a week (such as with Pilates classes!)
Consult an expert such as a Pilates instructor or physical therapist who can let you know how to improve your alignment specifically.
In order to correct bad habits, we must train our muscle memory to keep us in proper alignment until it becomes second nature. It takes practice, but the payoff is worth it: If abnormalities in spinal curvature are left to fester long enough, they can cause nasty issues including herniated discs and pinched nerves.
Herniated Discs & Pinched Nerves
Herniated discs, also known as slipped or bulging discs, refer to issues with the pad of cushioning between each vertebrae. This little cushion, called a disc, acts as a protective barrier between the vertebrae, keeps the spinal cord and extending nerves in place, acts as a shock absorber, and facilitates movement in the spine. Simply put, while the bones keep us upright, the discs keep us moving.
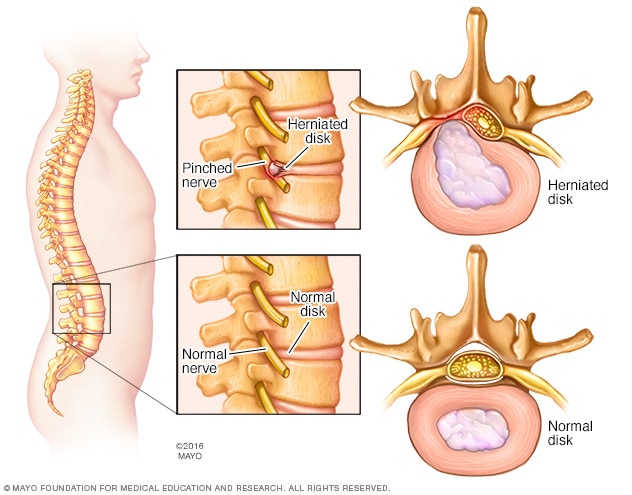
Herniated discs typically develop gradually due to excess pressure on the spine. This can be caused by a spinal curvature that isn’t treated, poor posture that goes uncorrected, or aspects of lifestyle such as obesity. Whatever the source of pressure, the disc is essentially squeezed out from between the vertebrae. Sometimes the issues end there and may or may not cause symptoms of pain or discomfort. (Some people with spinal disc herniation aren’t even aware of the problem.)
In some cases, the herniated disc leads to excess pressure on the nerves extending from the spinal cord, resulting in a pinched nerve. When people talk about signs of a herniated disc, they’re actually referring to symptoms caused by a pinched nerve.
Pinched nerves in the spine can lead to symptoms such as numbness or tingling, weakness, or shooting pain down a limb. When a nerve is pinched in the upper part of the spine, such as the cervical or thoracic, these symptoms may appear in the shoulder or arm. Pinched nerves in the lower portion of the spine, such as the lumbar, may cause symptoms in one or both legs.
If you think you may be experiencing any of these symptoms, please see a doctor immediately.
In severe cases, herniated discs and pinched nerves may require reconstructive surgery. But for many people, alternative treatments such as physical therapy and Pilates can be used to treat the underlying cause of the problem, specifically when that cause is an abnormality in spinal curvature.
Pilates for Back Pain...and Then Some
A large percentage of the clients who come into a Pilates studio arrive because of back pain. For the majority, this is due to improper posture, muscular weakness, or an abnormality in spinal curvature. Lucky them: we can help.
Pilates focuses on the deep core muscles with the goal of “training” your muscles to keep you in proper alignment. The majority of exercises are done in neutral spine, which simply means we’re encouraging the natural curves of the spine.
Pilates is known to focus on ab work, which is a slight misconception. Yes, one of our goals is certainly to help you engage your abdominals, but it’s not so you can rock a 6-pack. Because your abdominal muscles are opposite your spine, strengthening them helps stabilize your vertebrae and maintain the natural curves your body relies on. Along with the abdominals (all four layers), the “core” you so frequently hear about in Pilates refers to the pelvic floor, diaphragm, and muscles along your spine (multifidus, erector spinae, and longissimus thoracic, if you’re curious). Pilates exercises are designed to coordinate the engagement of these muscles so your body remains mobile and supple as long as possible.
If you’re just beginning your Pilates journey, we highly recommend starting with private sessions. At The Pilates Collective, we offer clients a complimentary private to start. This one-on-one attention allows the instructor to get a deep understanding of how your body functions and give you personalized feedback, both on your unique body and on specific classes we recommend.
To get a taste of Pilates, here are three exercises we recommend to keep your spine healthy.
Pilates for Posture
1) Roll down
Either standing up with your feet hip-width apart or seated on the edge of a chair, find your proper alignment. Feel that your spine is long with the crown of your head reaching towards the ceiling and your shoulders stacked over your hips (and your feet, if you’re standing). Take an inhale.
On your exhale, nod your chin into your chest. You’ll feel the spine bend forward. Continue rolling your spine forward as if you could articulate one vertebrae at a time. Let your arms dangle freely from your shoulders and keep a slight bend in your knees if standing. Roll all the way down until you’re bent at the waist with the crown of your head pointed towards the floor.
Hang out here for a few breaths if it feels good. You may feel a stretch in your hamstrings. To shift this stretch into your back versus your legs, increase the bend in your knees. When you’re ready to come up, take an inhale. On your exhale, engage your abdominals, legs, and pelvic floor and and restack your spine starting from the tailbone. Your head should come up last.
This is a great way to check in with your spine and encourage mobility. Do it as slowly as you can, breathing deeply. Notice if there are any places you have trouble articulating, such as in the thoracic spine. If it feels ok and doesn’t make you light-headed, do this 3-5 times. No breath-holding allowed!
2) Seated twist
This is great for improving thoracic spine mobility. Sit up tall either on the floor or on a chair. If you’re on the floor, extend your legs in front of you or cross them, whatever is comfortable and allows you to sit up tallest. If on a chair, plant your feet on the floor about hip-width apart.
Extend your arms out to the sides. Feel like you’re radiating energy all the way out your fingertips, and keep a slight bend in your elbows. Your shoulders should be away from your ears and your back should feel broad. Engage your abdominals to keep your pelvis and sitz bones grounded.
On an exhale, twist from the waist to your left. Your arms will move in space, but the movement should come from your torso; your arms should stay even with your shoulders the entire time. Inhale to come back to center. Repeat on the right side and do 5 sets.
You can use your exhale to deepen the twist if that feels ok for your body. Once you’re rotated to one side, see if you can exhale and twist a little further, imagining you’re wringing out your spine like a wet rag.
3) Side bend
Stay seated, either on the floor or on a chair. Bring your arms out to the sides just as they were for the seated twist. Take an inhale, extending your spine long and tall. As you exhale, reach your left arm down towards the floor or the edge of the chair and reach your right arm overhead like the arc of a rainbow. Let your spine follow.
Imagine your spine is getting longer as you bend, not crunching down. You should feel a stretch in your right side. Stay here for a couple breaths and return to center on an exhale. Repeat on the other side, doing 5 sets.
To learn more about keeping your spine healthy and to take advantage of your free introductory private session, contact us at info@pilatescollectivedenver.com. We offer a full schedule of group classes as well as options for private and semi-private sessions.
We look forward to supporting you in your journey to a healthy spine!
Want to learn more? Here are some of our sources:
Mayo Clinic - Pinched Nerves
Mayo Clinic - Herniated Discs
Mayfield Clinic - Anatomy of the Spine
Spine & Orthopedic Center - Scoliosis Treatment Options