
 Those of you who follow me on Instagram will know that I was recently in Australia, visiting family. While I was there, not only did I stock up on all my favourite treats and snacks but I also undertook to make one of my favourite Australian treats from scratch with mum. Because, well, when you’re supposed to stay at home, what better thing to do than bake?
What is a Tim Tam, I hear you ask? An iconic Australian biscuit (cookie) that you can now get some iterations of (but not ALL the good flavours) here in Canada. It’s a riff on the classic UK Penguin biscuit developed by Arnott’s director of food technology (who thought he could make Penguin biscuits better) and named after the winning horse in the 1958 Kentucky Derby.
According to the Arnott’s website,
Tim Tams are Australia’s most loved chocolate biscuit. With a unique combination of biscuit, cream filling and chocolate coating, it’s an indulgent treat you’ll want to share with friends and family.
(or, you know, not!)
There is the Classic collection (Original, Dark, Double Coat, White, Chewy Caramel and Choc Mint) and the new Crafted Collection but my favourites ones are definitely the double coat and the Choc Mint. So when I saw someone posting on Facebook about needing to make Tim Tams because they live in France and can’t get them, I wondered immediately HOW do-able they are to make at home.
I found various recipes for Tim Tams online – Laura from A Beautiful Plate shared Sarah Coates‘ recipe from her book The Sugar Hit and I found a similar recipe over at 196 Flavors. Now, since I like the Double Coat Tim Tams I was toying with the idea of just making these but I didn’t want to buy malted milk powder (well, I didn’t want to buy a giant can of it because I knew mum wouldn’t use it after I left) so I wondered about making the mint version. Well, I couldn’t find mint essence for love or money in Sydney that week (panic buying of baking supplies, much?) so I raided mum and dad’s liquor cabinet and found this…
 The ultimate 70s addition to any cocktail cart, right? And so the plan for the (boozy) mint Tim Tam was hatched.
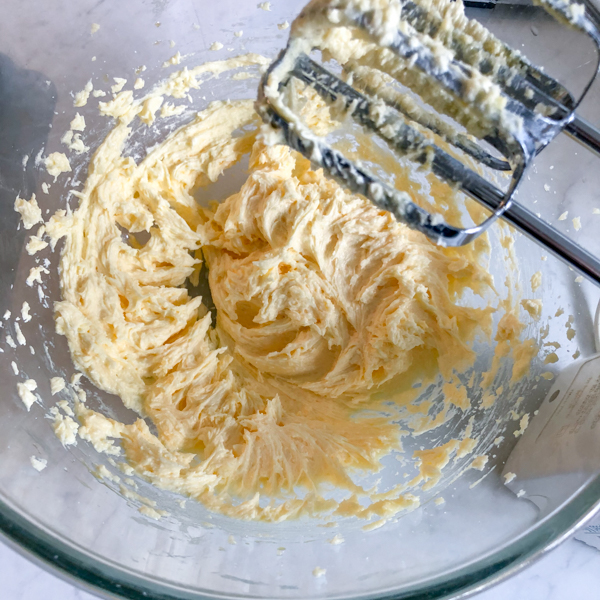
This is actually a perfect project for those of us spending more time inside these days because it can be done in stages. Specifically, whip up the dough by creaming the butter and sugar then add an egg…
 and cocoa powder…
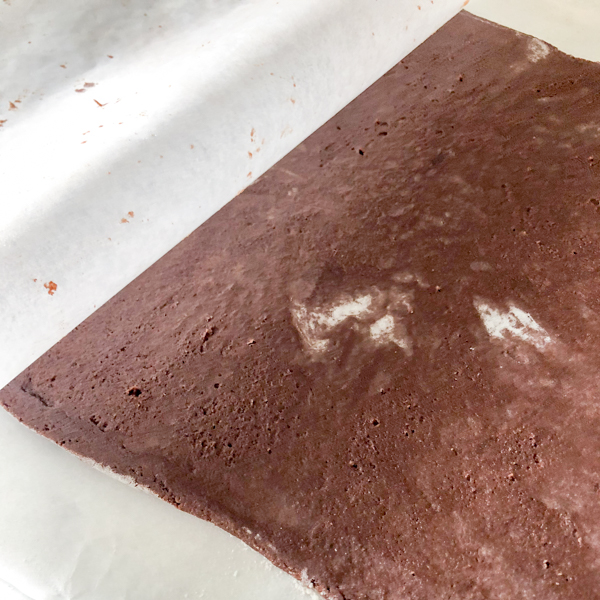
 Then some flour. Then roll this very soft dough out on floured parchment paper…
 and chill in the freezer for an hour.
Remove the dough from the freezer and use a real Tim Tam to approximate the size (or, you know, make yours a lot bigger 😉
 Then bake and cool completely..
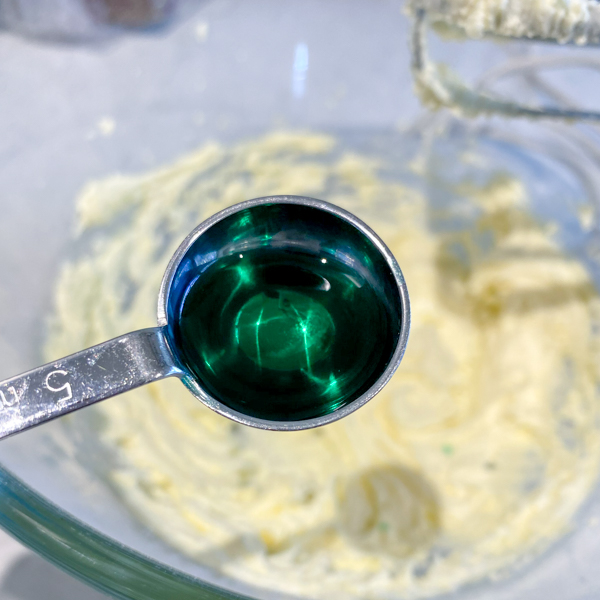
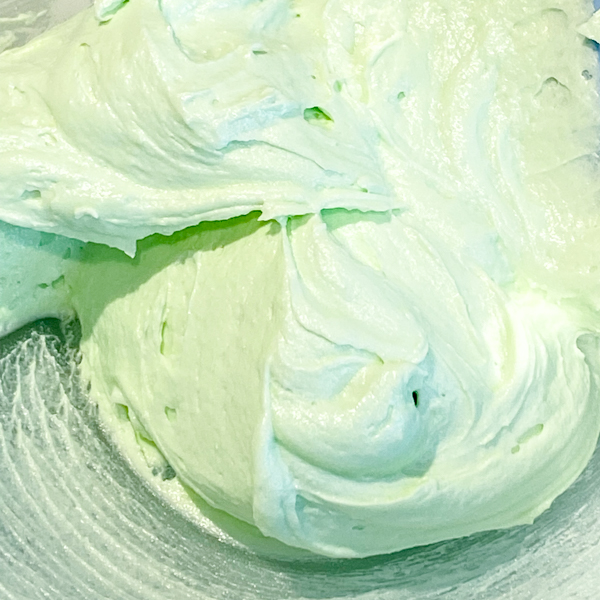
 Meanwhile, whip up your filling – butter, icing sugar and crème de menthe (or mint essence if you have it)…
 And use an offset spatula to spread the filling on half the biscuits…
 Use that same offset spatula to clean off the edges…
 Then freeze these again before dipping them…
 I used chocolate, corn syrup and a little vegetable oil…
 Those needed to chill in the fridge (and actually be stored in the fridge too).
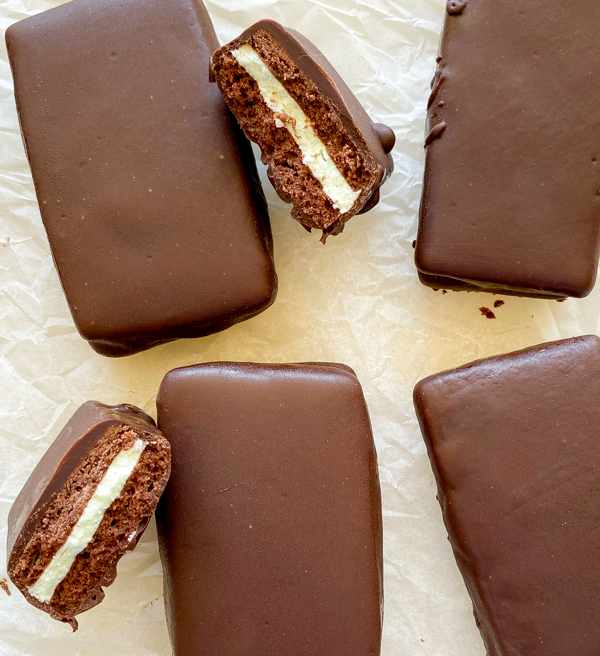
 Ok so mine are a little bigger BUT we (mum and I) thought they were the perfect size 😉
A perfect project for those of us staying home these days, right?
Homemade Tim Tams with a creamy mint filling Adapted from Sarah Coates' recipe for Tim Tams in her book "The Sugar Hit". As an Amazon Associate and member of other affiliate programs, I earn from qualifying purchases.Homemade Mint Tim Tams
Ingredients
for the biscuit (cookie):
for the filling:
for the coating:
Instructions
Make the biscuits (cookies):
Cut and bake the biscuits (cookies)
Prepare the filling
Fill the biscuits (cookies)
Prepare the coating and dip the cookies
Notes
Recommended Products
 What about it? Does this look like a self-isolation project for you?


_________
Please note: This post contains affiliate links. I am a participant in the Amazon Services LLC Associates Program, an affiliate advertising program designed to provide a means to earn fees by linking to Amazon.com and affiliated sites. This means that if you click over and purchase something, I will receive a very small percentage of the purchase price (at no extra cost to you). Thank you in advance!
__________
__________
MY BOOK! In the French kitchen with kids is out now! Click here for details and how to order!

We grew up on Penguin Biscuits! My mum always has some hidden away and will tuck one in my pocket when we leave for the drive home!
Love Penguins but these are INFINITELY better 😉
Having spent a few months in OZ, I can confirm that yours look amazing!
Thank you so much 🙂 They taste pretty good too!
Yep, big hit around here Mardi. Great home visit project.
I was thinking of just getting a package or two of mint Oreos, making the coating, and dipping the Oreos in the coating. Would save a lot of work! (I wish they’d come out with chocolate-covered Oreos!)
Well, yes, but not the same thing at all 😀 And I do believe they have chocolate covered Oreos!